
So without further ado here is the pattern for the Bubble Bum Baby Bloomers.
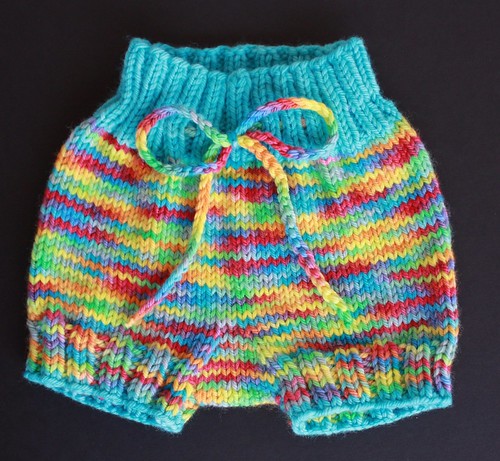
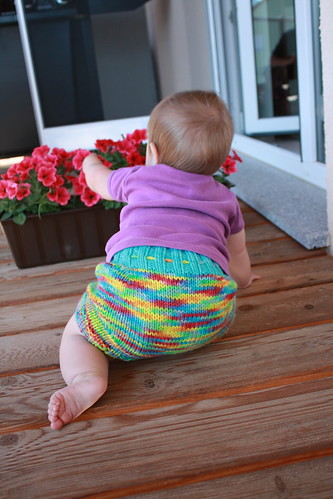
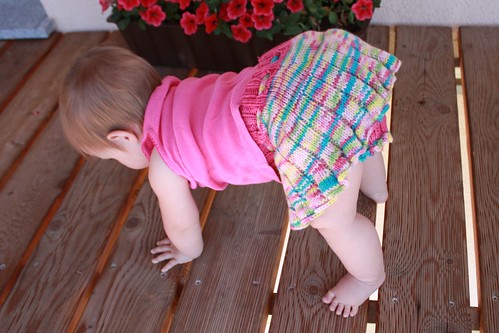
This is a pattern for bloomers or “boy shorts”. It is easy to add a skirt for a skirty with bloomers underneath. Or instead of doing the short ribbed legs/cuffs you can also knit this pattern into shorties or longies.
Skills needed are cast on, knit, purl, yarn over, purl 2 together, increases (see abbreviations below for type), short rows, kitchener stitch and bind off.
Gauge is 5 spi. Please use needle size required to get gauge. You will also need a needle two sizes smaller than needed to get gauge.
Here are a few abbreviations that are used in the pattern.
k – knit
p – purl
m1f – Make one front. Lift the bar running between stitches onto a needle from front to back. Knit this stitch through the back loop. Also known as M1L (make one left)
m1b – Make one back. Lift the bar running between stitches onto a needle from back
to front. Knit this stitch through the front loop. Also known as M1R (make one right)
yo – yarn over
p2tog – purl 2 together
You will need stitch markers, circular needles in size required to get gauge in 16” and 12” lengths for size 3 month and up and 12” and 9” (or double pointed needles, two circulars, or one long circular needle for magic looping) for the newborn size, circular needles in two sizes smaller than required for gauge in 16” length for sizes 3 months and up and 12” for newborn size, double pointed needles in size for gauge, a yarn needle and if you choose the picot edging a crochet
hook.
Here are a couple of helpful links.
This is my preferred method for short rows. I do not describe how to work short rows in the pattern, only when to insert them. Use whatever short row method you prefer, or try this method out. http://www.woolywonder.com/forums/showpost.php?p=74291&postcount=34My
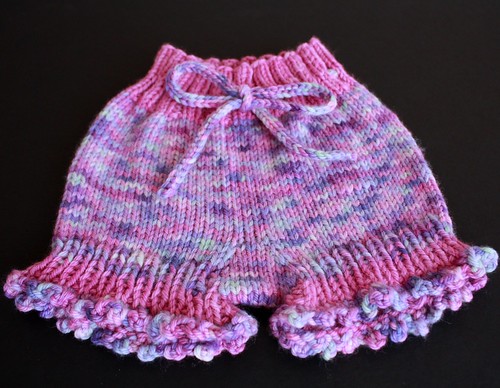
For the bloomers I used a crochet picot bind off. This is the video I found most helpful, even though it is showing an edging and not a bind off. To use it as a bind off, follow the instructions from the video only instead of inserting the crochet hook into already bound off stitches you will be inserting it into the live stitches on your needle and slipping them off the needle as you crochet into them. http://www.youtube.com/watch?v=mhJr-M0kKnM
Sizes are newborn (3 month, 6 month, 12 month, toddler) with hip measurements of approximately 14” (16”, 18”, 20”, 22”) and rise measurements of 12”(14”, 16”, 18”, 20”). Please knit to appropriate hip measurement rather than age for the best fit. Sizing by age is an approximate and as we all know babies come in all shapes and sizes. It is easy to adjust the rise as well for the best possible fit.
Using a stretchy cast on, I use the backwards loop cast on, cast 64 (72, 80, 88, 96) stitches onto the smaller needle. Place a marker and join in the round. Knit in k2, p2 ribbing for 1.5(1.5, 2, 2, 2) inches. If desired insert an eyelet row for your drawstring at about 1(1, 1.25, 1.25, 1.25) inches from your cast on edge. To do this do one row of *k2, yo, p2tog* repeat between ** around. On the following row resume your k2, p2 rib pattern.
Once you have knit in 2x2 rib for 1.5(1.5, 2, 2, 2) inches switch to your main color if using both trim and colorway and your larger needles.
Row 1 k24(27, 30, 33, 36) pm, k16(18, 20, 22, 24) pm, k24(27, 30, 33, 36)
Row 2 knit to first marker, m1b, slip marker, knit to second marker, slip marker, m1f, k
nit to end of round.
Row 3 knit all stitches, slipping markers as you come to them.
Row 4 knit to first marker, m1b, slip marker, knit to second marker, slip marker, m1f, knit to end of round.
Repeat rows 3 and 4 for a total of 4(4, 4, 8, 6) increase rows. Y
ou should now have 72(80, 88, 104, 112) stitches. You can now remove the stitch markers for the increases, don't take out your start of row marker.

Now just knit until your work measures 3(4, 5, 6, 7) inches from the cast on edge. If you are making a skirty then you may want to insert a purl row somewhere in here to make it easier to pick up stitches for the skirt. Or not. It's up to you.
When your work measures 3(4, 5, 6, 7) inches from the cast on edge it's time for some short rows. Insert hip markers by knitting 18(20, 22, 26, 28) pm, k 36(40, 44, 52, 56) pm, k18(20, 22, 26, 28). On the next round knit till one stitch before the second marker, and insert a short row using your preferred method, turning again at one stitch before the first maker. Knit around closing both gaps and then insert a second short row, this time turning at 3 stitches before each marker. Do this for a total of 5 short rows, moving two stitches closer to the center back each time.
Knit one complete round, removing your hip markers and placing markers for gusset increases. Do this by knitting one, pm, k34(38, 42, 50, 54) pm, k2, pm, k34(38, 42, 50, 54) pm, m1f, k1. This should bring you back to your beginning of row marker, which you can remove at this point. The last marker that you placed is your new beginning of row marker. So continue this first row by k1, m1b, knit to next marker, slip marker, m1f, k2, m1b, slip marker and then knit to next marker. This is row one of your gusset.
Row 2 knit around slipping markers as you come to them.
Row 3 m1f, k4, m1b, slip marker, k to next marker, slip marker, m1f, k4, m1b, slip marker and knit to first marker.
Row 4 knit around slipping markers as you come to them
Row 5 m1f, k6, m1b, slip marker, k to next marker, slip marker, m1f, k6, m1b, slip marker, *k2, p2* repeat between ** to end of round. This is the start of establishing the 2x2 ribbing for the leg cuffs. If you prefer 1x1 ribbing then *k1, p1* instead of *k2, p2*. Or if you are knitting shorties or longies leave out the ribbing entirely.
Row 6 knit 8, slip marker, *k2, p2* repeat between ** to next marker, slip marker, k8, slip marker, *k2, p2* repeat between ** to end of round.
Row 7 m1f, knit 8, m1b, slip marker, *k2, p2* repeat between ** to next marker, slip marker, m1f, k8, m1b, slip marker, *k2, p2* repeat between ** to end of round.
Row 8 On this round remove the markers as you come to them. Knit the first 10 stitches onto a double pointed needle. Knit the next 34(38, 42, 50, 54) stitches onto your 12” (or 9” if you are doing the newborn size) circular needle keeping in the k2, p2 rib pattern. Knit the next 10 stitches onto a second double pointed needle. Leave the remaining 34(38, 42, 50, 54) stitches on the needle or move them to waste yarn if the needle is in your way.
Kitchener the gusset stitches that are on the double pointed needles together.
Starting with your left leg (the one on the shorter circuler needle) pick up two stitches from the gusset, place a marker for the start of your round and *k2, p2* around for four rounds.
If you are making boy shorts style then bind off loosely in pattern, repeat for the second leg. Weave in your ends and you are done!
If you are making bloomers then knit all stitches one round, bind off with the picot bind off, repeat for the second leg, weave in your ends and you are done!
If you are making longies or shorties then don't do the ribbing, knit till your desired inseam, add your desired cuff, bind off, weave in ends and you are done.
If you are making a skirty then finish as for bloomers and go back and add the skirt style of your choosing. At a later day I will add instructions for one style of skirty that I like.
This pattern has not been tested. That makes everyone who knits it my testers. So if you find any issues, typos, incorrect numbers, etc please let me know so that I can fix the pattern. I have done my best to insure there are no typos and the numbers work out, but I am human and I make mistakes. Some days a lot of them.
Please do not copy this pattern and distribute it either for free or profit. It's a free pattern, if you know someone that wants a copy please just direct them here to my blog. I cannot control what you do with objects you knit from my pattern so do with them whatever you please. However I do ask that you please give credit to this pattern by name if you sell finished objects made from it.

Darling! Can't wait to knit some!!!
ReplyDeleteVery cute Tara! Next in line in my queue!
ReplyDeleteThank you!
ReplyDeleteHi love the pattern... How would I make the gusset bigger/wider for a toddler?
ReplyDeleteWow! You are so talented and thank you so much for sharing the pattern. I have made lots of crochet longies from my own pattern but have been dieing to try my hand at knitting some. I love your yarn, the colorways are beautiful.
ReplyDeleteThese are great, thanks for sharing! :) Almost finished with my pair!
ReplyDeletethese are really cute. thanks for sharing.
ReplyDeleteReally enjoyed making these shorts. They were really easy to follow. Took me one day to complete. I really like how easy it is to make so many different things with just one pattern. Your instructions were very easy to follow and i did find any mistakes. I'm going to be making more for sure.
ReplyDeleteI have knit three of these so far. I'm working on a larger pair currently for my Grandson. The pattern is easy to follow. These are nice as they are less bulky than some others. I use this pattern mostly for day time covers. The one on my needles I am working in double knit for the body so it will be better for night time use. My grandson is quite skinny (all of my family's babys are). I do more in the crotch so the leg openings are a little bit smaller.
ReplyDeleteThis comment has been removed by the author.
ReplyDeleteCute pattern!
ReplyDeleteHi! I am confused about one part. Should I knit all the way around to remove/knit the wraps or move back and forth between the markers to remove/knit the wraps, 1 each row. Thanks!
Hi Staxy! Yes, for the short rows, you knit around and then pick up wrap and stitch and knit together each time...hope that helps!
DeleteWhat size needles do you find yourself using for most worsted weight yarns? I'm horrible at finding gauge using the standard methods- I'm better starting with a certain needle, then moving up or down a size as needed.
ReplyDeleteUse a needle size by using one appropriate for the yarn you are using. Your instructor should have showed you how to best determine that; I just double the yarn, and the thickness is the needle size!!
DeleteThe only way to know for sure is to knit a small swatch... about 6 inch square works. Everyone likes a different feel to the fabric, so YOU need to find the one YOU like. Mine will be different!!
Annette, I am using a bulky yarn and size 4.00 mm needles in order to get the tighter knit I need for my heavy wetter, lol.
ReplyDeleteHi TaraLee! For the repeat of increase rows...the 6 and 8 are transposed. It should be 6,8 for sizes 12 month, toddler. Your instructions state "Repeat rows 3 and 4 for a total of 4(4, 4, 8, 6) increase rows. Y
ReplyDeleteou should now have 72(80, 88, 104, 112) stitches.
I'm a novice knitting my very first short row... After inserting hip markers, the pattern says ...knit til one stitch before the second marker... Is the second marker the first hip marker after the marker that starts my knitting in round (the marker placed after the first 18 stitches knit)? Also, in that same sentence, it says ... turning AGAIN at one stitch before.... I'm confused by the word AGAIN, have I turned?
ReplyDeleteI didn't see an explanation of nit that is on row 2; nit to end of row. Do you mean knit?
ReplyDeleteI've used this pattern,without the short rows,for making longies for my daughters.I believe I have knitted 6 so far,al with wool,for the winter.My 6 year old has the waist of a 1 year old,so is really hard to find warm pants for her( even slim skinny is huge on her,which is the tiniest size you can find online). Love them and so do my daughters.Plan on making another one soon.Goes pretty fast too.Thank you for this wonderful pattern.
ReplyDeleteHi, thank you so much for this beautiful pattern! I just made the baby bloomers, and just love it! I was wondering if you ever wrote the instructions for putting a skirt on them?
ReplyDelete